
As you may know, it’s now possible, from a Salesforce Flow, since Spring 23 (in BETA) to perform an http API callout. This is very usefull if you want to retrieve some Data from an external API, without A SINGLE LINE OF CODE !!! I promess 😉
In this tutorial, I propose to easily retrieve the Bitcoin exchange rate and display it in a screen flow. EASY.
So we will setup:
- The named credential (the URL and authentication on the API)
- The screen flow itself, that will use the API configured in the named credential to perform the request on the API.
For this example, I will be using coinmarketcap. It’s free if you do only a few API call, you can register and get an API key for free.
Get an access to an exchange rate API
First of all, please notice that I take this as an example, I’m affiliated with no way with this API provider.
This API key is important because it will be used to authenticate on the API of coinmarketcap. Simply register, get your API key and store it to use it further.
This API key gives access to several services.
In this tutorial, we will be using this one and see how to configure it into Salesforce : https://pro-api.coinmarketcap.com/v2/tools/price-conversion?amount=1&symbol=BTC
Configure a Named credential in Salesforce setup
Now that you have created your API key, you need to create what we call a Named Credential in your SFDC org.
What is a Named credential? Well, that’s where you will specify the base URL of the API you want to use and how you want to authenticate on this API. That’s where you’ll need to add the API key you have previously created!
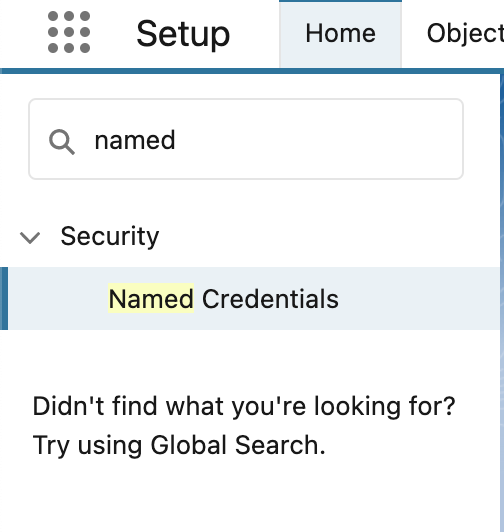
To do that, go to Salesforce setup and search for Named credential and click on it:
Create an external credential
What you have to do first is to create an external credential that will be the configuration of the authentication on the Remote REST API.
Go directly to the external credentials tab and click on new.
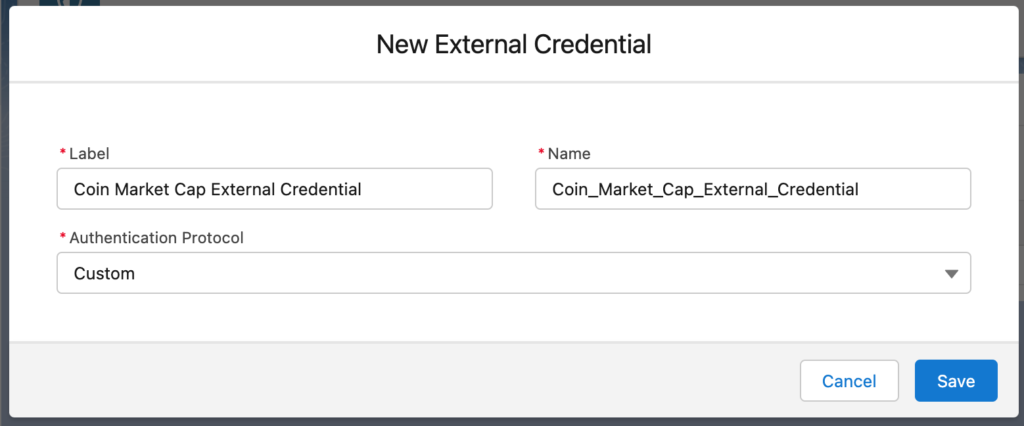
- Label: chose a label that make sense to identify the external credential
- Name: this will be the technical name. For me it didn’t auto-populate, so the same value as Label but with underscores should do the job
- Authentication Protocol: we will not use oAuth, so please put “Custom” so that we can define further the API key
Setup the API key in the external credential
Now that your external credential have been created, scroll down untill Custom Headers…

…Click on New.
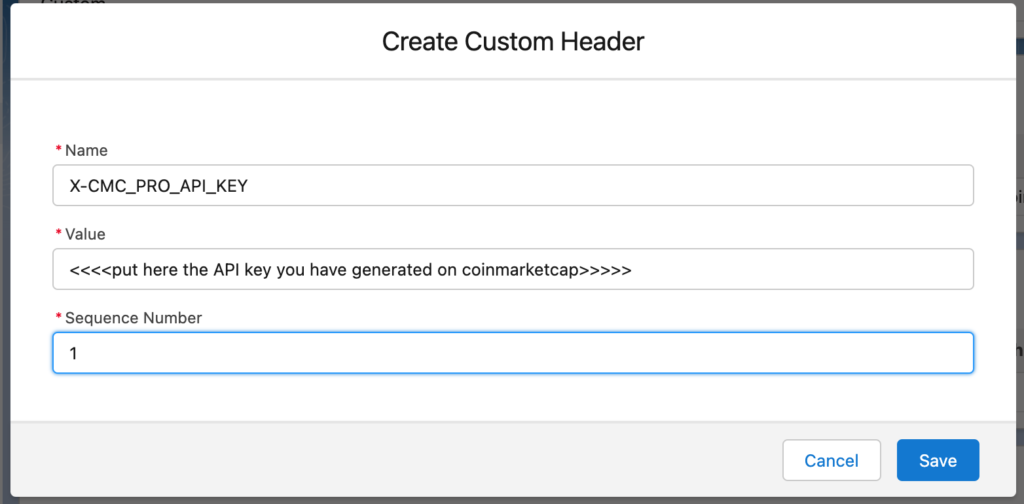
The documentation of API specifies that for authentication purpose, a header with the name X-CMC_PRO_API_KEY and the value they give to you should be put on each http request when requesting the API. Make sure to put the value you have previously generated on Coinmarketcap ! (and leave “1” as the sequence Number)
Hit Save to update your external credential.
At this stage, you have setup the authentication. Now, let’s move to the configuration of the API call itself.
Create the named credential
Now that the external credential is created, you can create the named credential. It must reference the external credential you have juste created so that the http headers will be automatically added to the request.
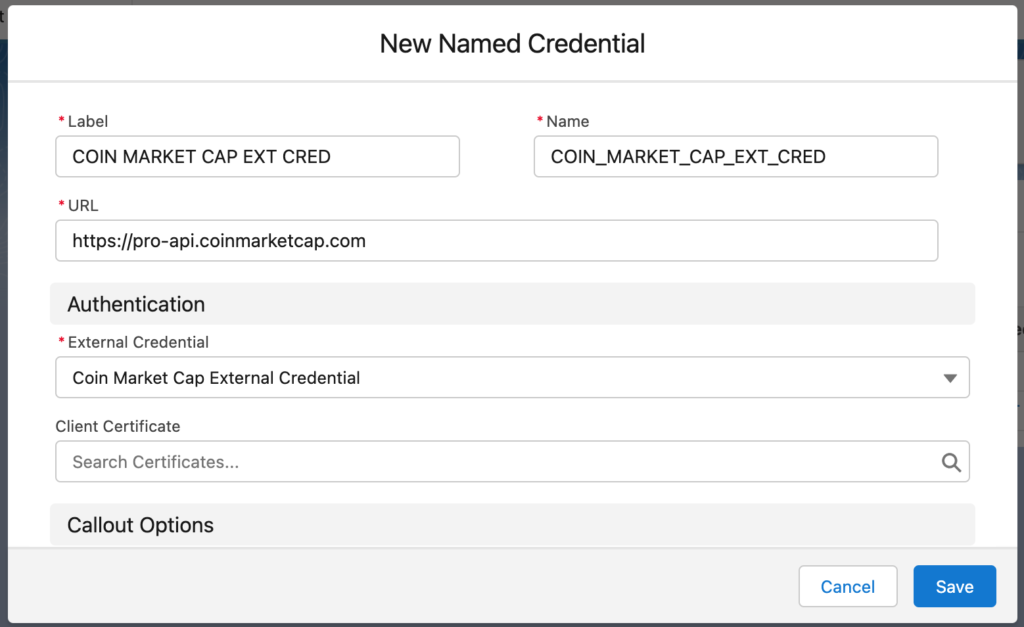
- Give you Named Credential a relevant Label and Name.
- The URL must be the base URL of the API (only the domain name with https): https://pro-api.coinmarketcap.com
- Reference the External credential to automatically add the header you configured to the http request to the API
Now, the API access have been created. We will now design the screen flow to use this named credential to perform an external request to the API of coin marketcap and display the result to the user!
What have we done?
We have setup the access to the API and the authentication
What remains to do?
Request the API and display the result
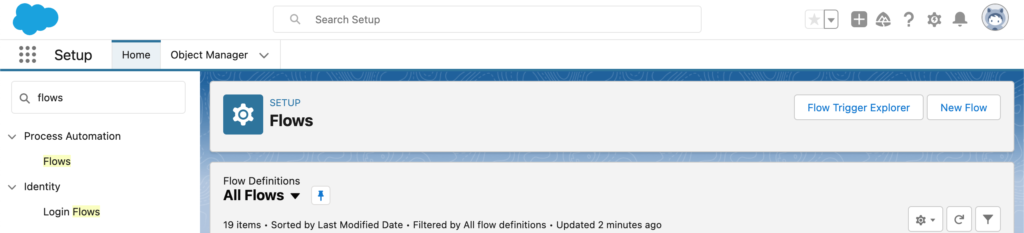
Create the Salesforce Screen flow for HTTP API callout
In the setup, search Flows and click on “New flow”
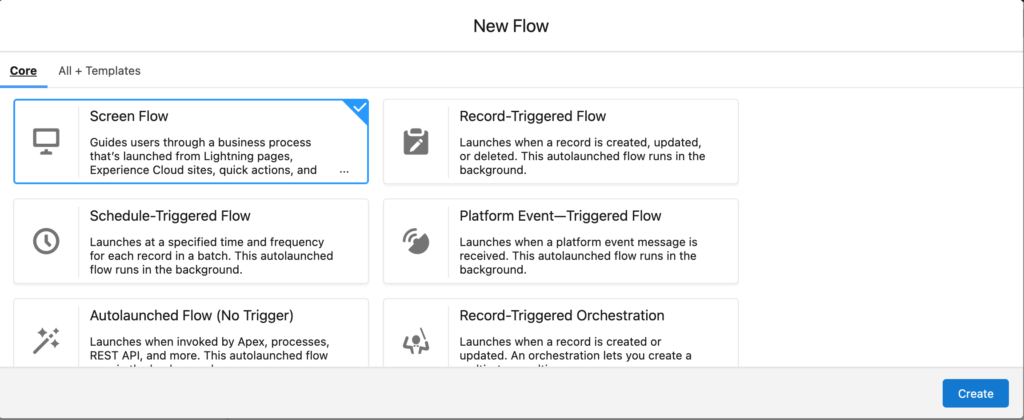
Click on Screen flow, then on “Create”
Create an invocable action in the Salesforce screen flow
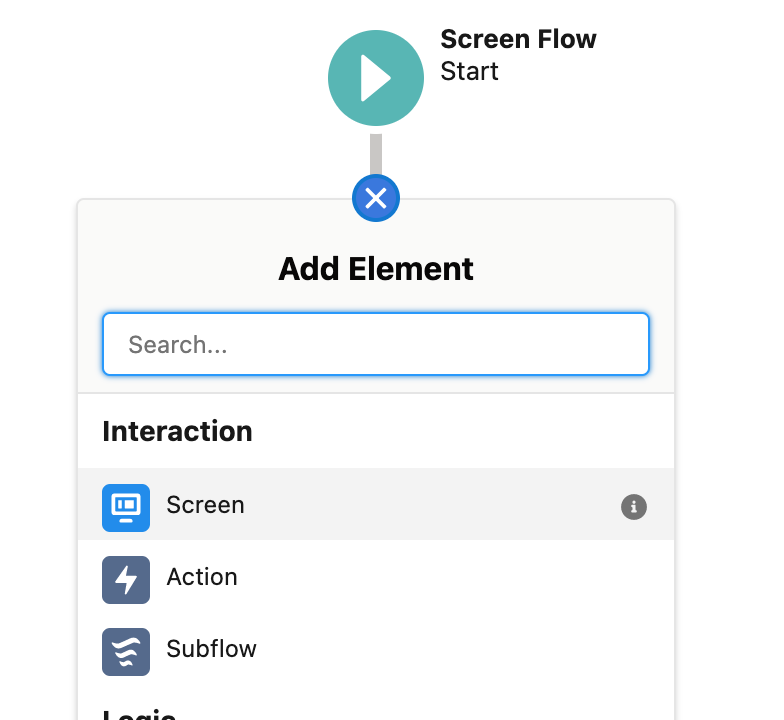
The first Action we want to do in the flow is to request the API to get the actual value of 1 bitcoin converted into $ USD. For that, add an “Action” element directly below the start of the flow
In the “New Action” window, Scroll down and click on “Create HTTP Callout (Beta)” please note that it’s currently in Beta.
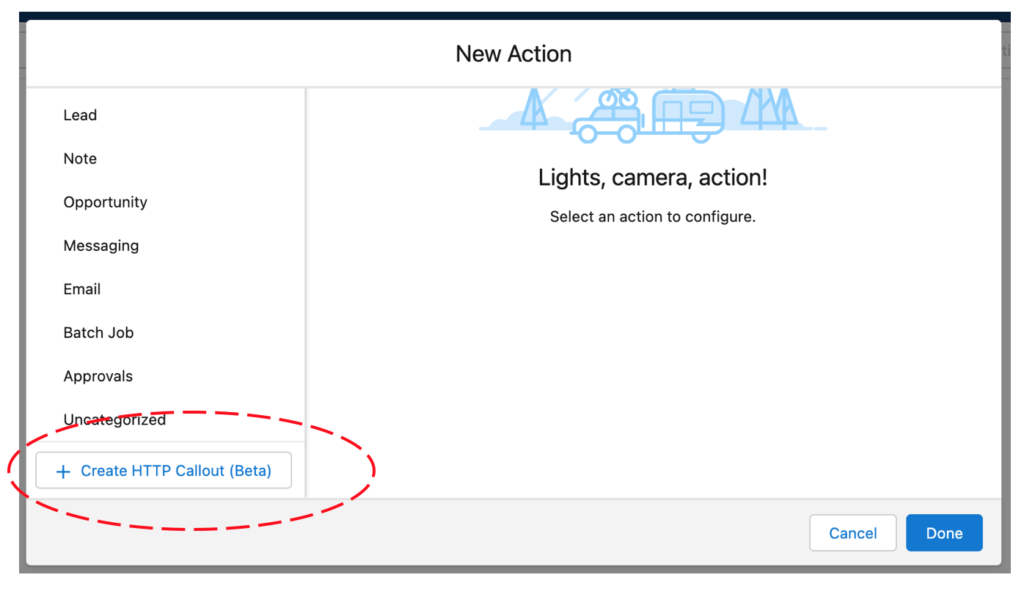
Clicking on the button will open the creation of an invocable action that begins with the creation of an external service.
An external service can be seen as something that is referencing the Named credential. External services can be created outside of the flow feature and can be used in an Apex Class.
Unfortunately, I didn’t see a way of reusing an external service that have been set up in a Flow… so, let’s do that!
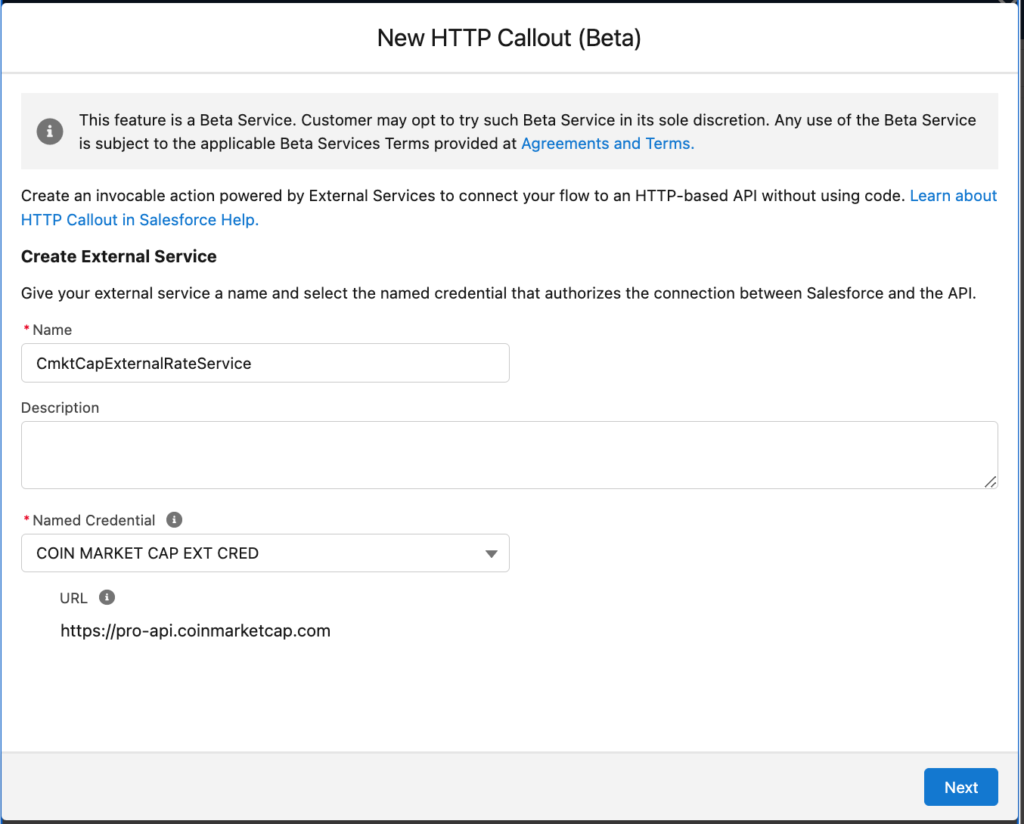
- Name your service
- Reference the named credential previously created
- Click on next
The next screen, you’ll be where you’ll be configuring the invocable action.
It means that you configure the rest of the URL:
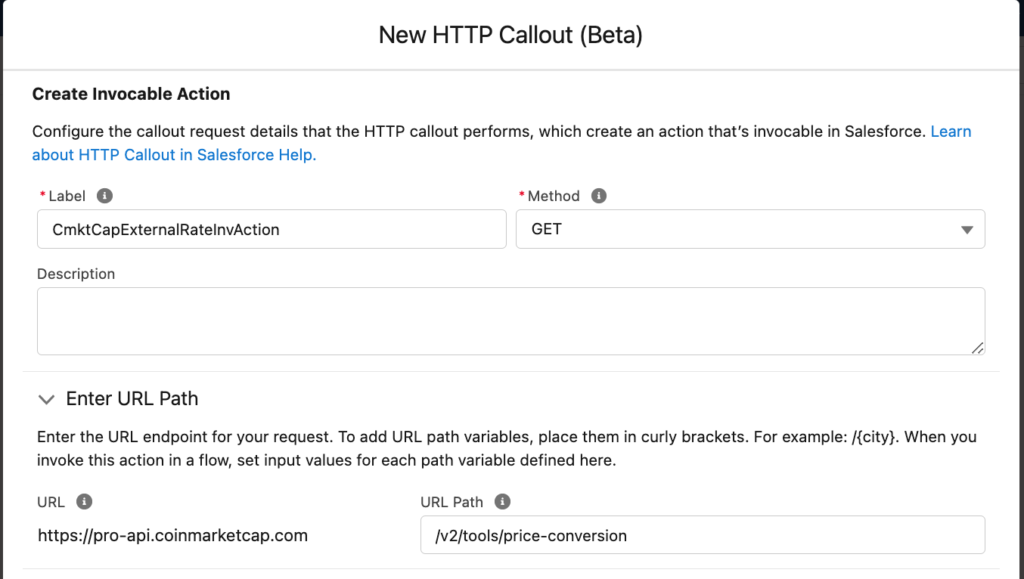
- Label: give a friendly label
- Method: for this Webservice, it’s configured to use the GET method (please notice that GET is the only method supported by http callout 🙁 )
- URL Path: enter the rest of the URL of the service, but without the parameters that should remain dynamic and passed as parameters to the action
Scroll down and to enter the parameters so that it will be automatically injected in the URL: amount and symbol (symbol is the cryptocurrency code)
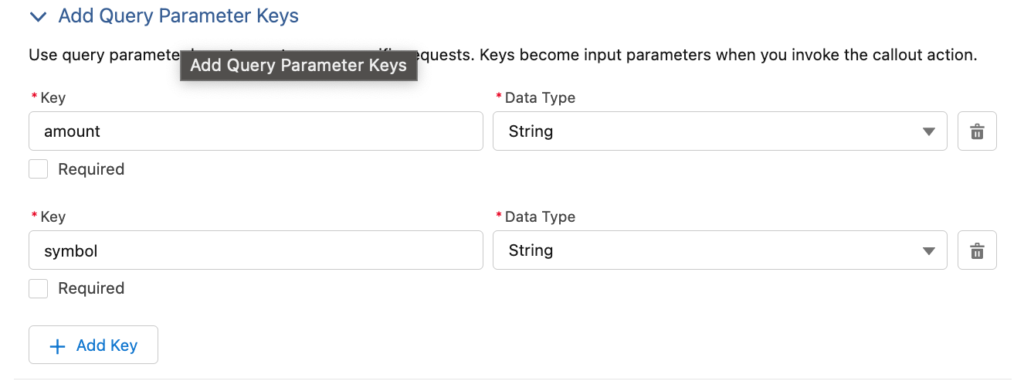
Add the parameters that you found in the documentation, here:
- amount: the amount to convert
- symbol: the crypto currency code
So that you understand well, here is the detail regarding the structure of the URL I’m using:

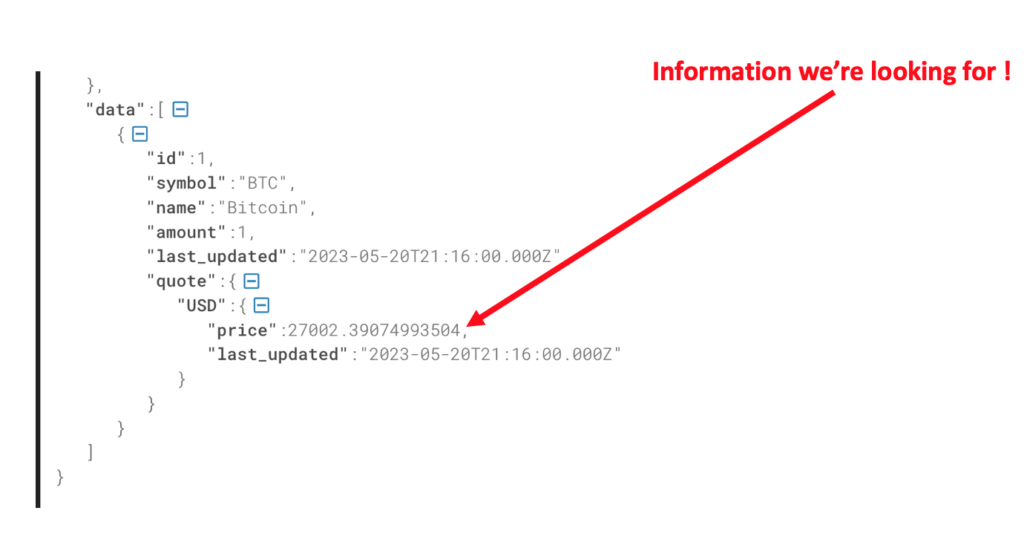
Now, you need a sample of what the API returns so that SFDC know what to expect as a feedback. You can find the example here, in the coin market cap documentation or by doing a curl from your machine.
Just click on New…

This will generate the Data Structure for the API response
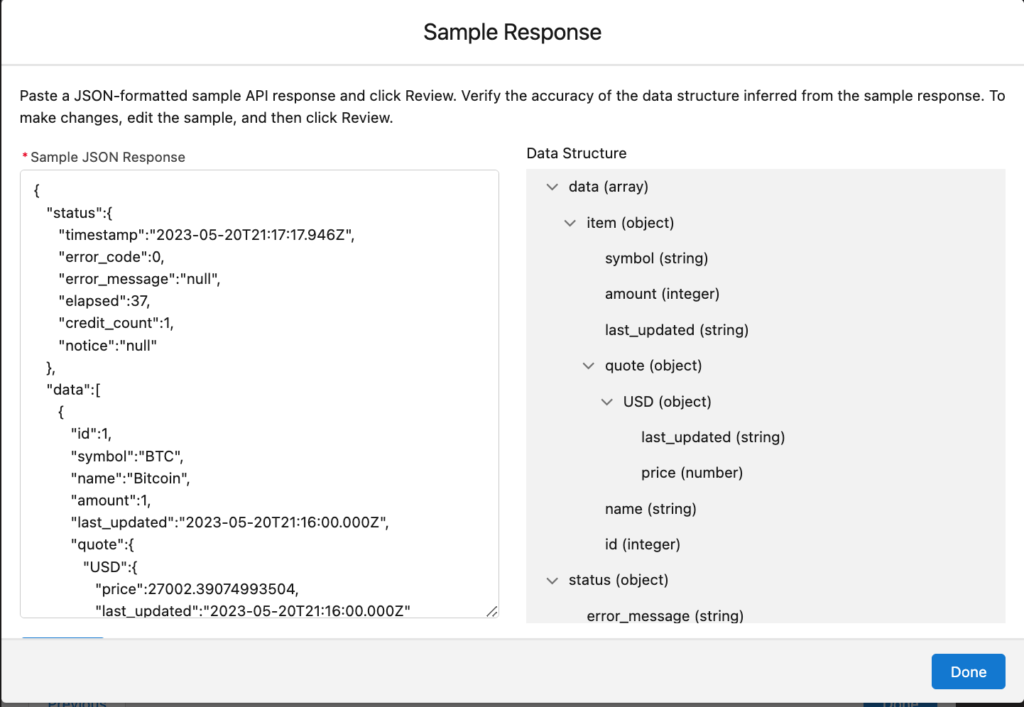
- Provide the JSON sample you found when testing the API with a CURL
- Click on review so that Salesforce can parse it and generate a Data Structure
- Click on Done to validate the structure
- Click on Done to finish the creation of the invocable action in the previous window
What have we done?
At this step, we have set up a reusable Invocable action that is using the Named credential that we have previously created.
What needs to be done?
At this step, we have to create an action that will use the invocable action we have just created.
With this action, we need to retrieve the rate and then display it in output field on a screen.
Create the action used in the Salesforce flow
First, in the New Action window, give a Label and an API Name to the action:
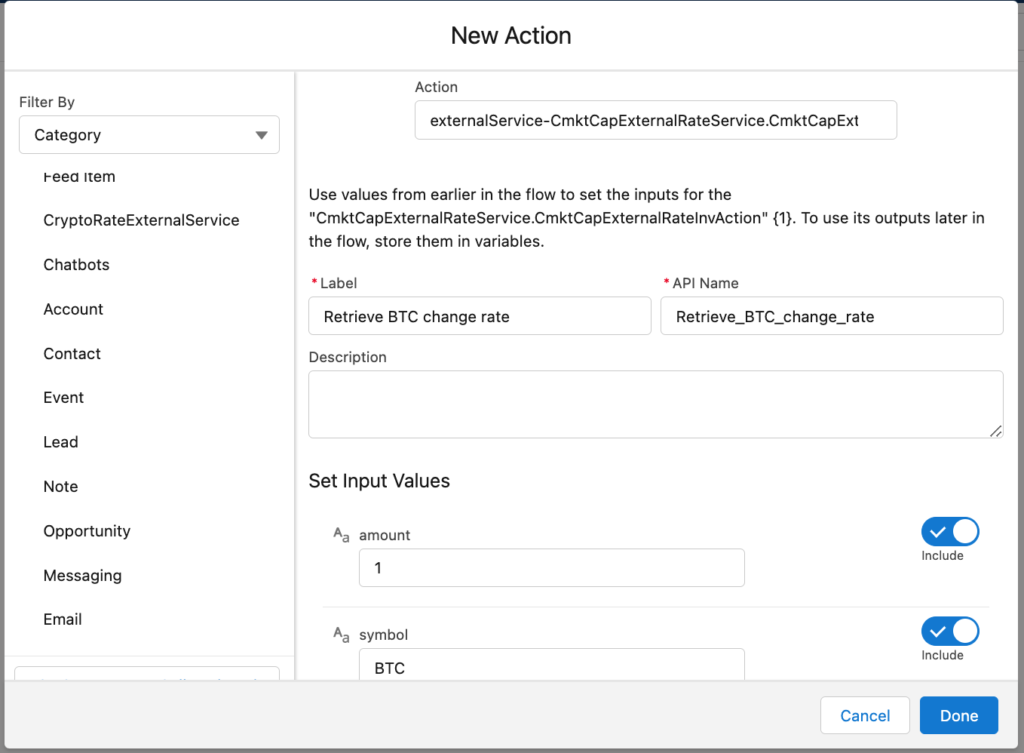
- For the amount, type 1: we want to convert 1 unit of crypto currency
- For the symbol, type BTC, which is the code for the Bitcoin
Scroll down.
The advanced part is VERY IMPORTANT, this is the most tricky part because this is where we need to configure how the action we are currently configuring will store the data retrieved by the Webservice.
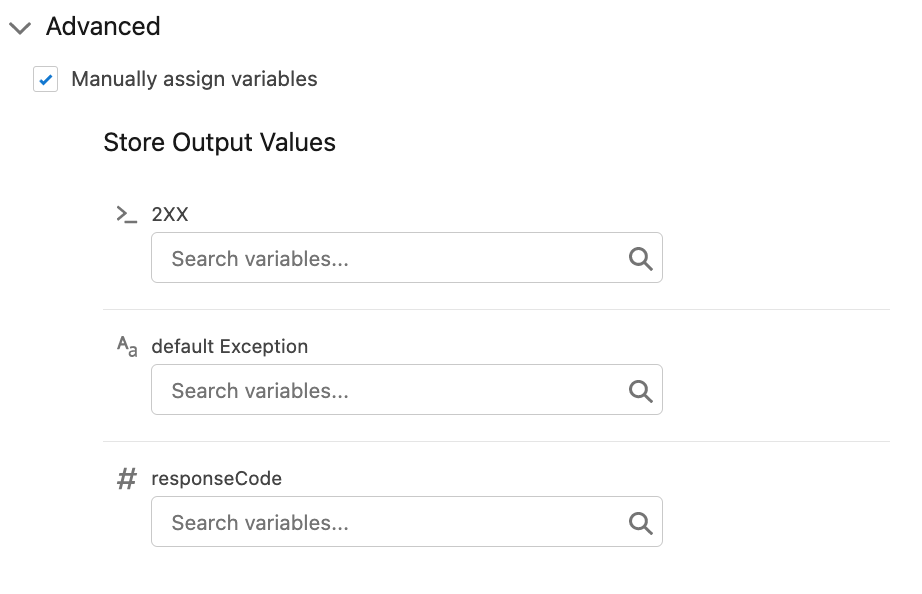
The response of the API will be store in the 2XX variable, if you don’t store it somewhere, you will not be able to use it further!
Note that the Format of the retrived data is an Apex Class that have been auto generated.
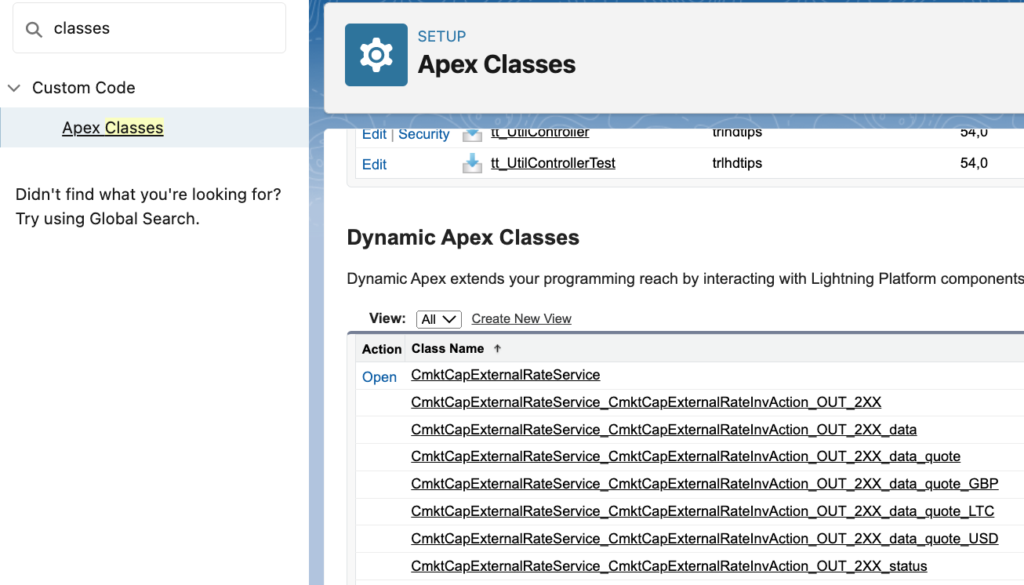
Open another window, check the Apec classes, you will be able to see the generated classes.
Here we can see that the return will be of type CmktCapExternalRateService_CmktCapExternalRateInvAction_OUT_2XX
Come back to your action in the Screen flow. Check the “Manually assign variables” checkbox to manually assign the responses in flow variables.
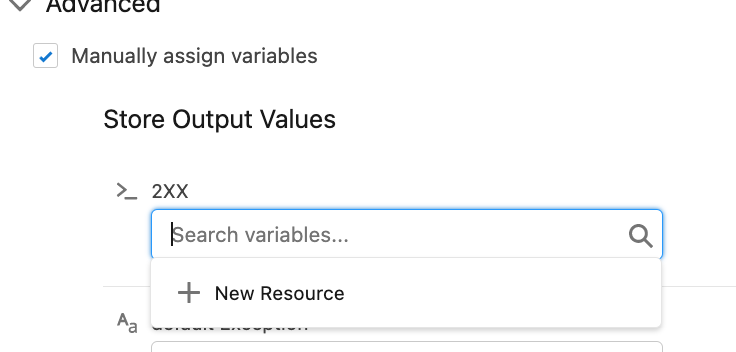
Click on “new resource” to create a variable that will contain the reponse of the API
And here is how you should create this variable:
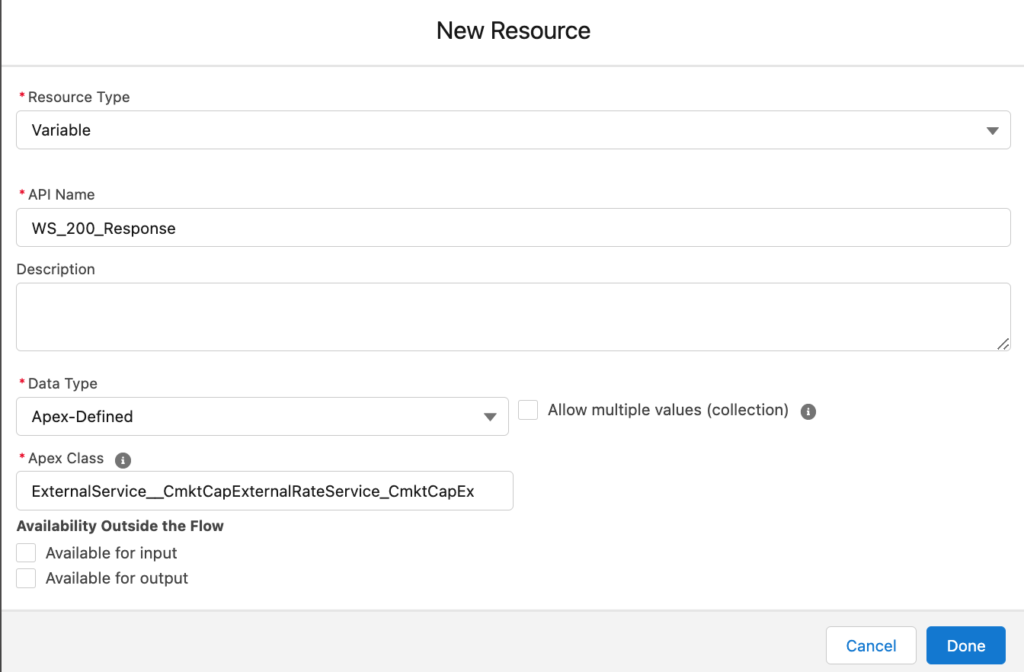
- Resource Type: Variable
- API Name: this is the name of the variable, feel free to put one as your naming conventions requires
- Data Type: select “Apex-Defined” so you can chose the automatically generated class we found before
- Apex Class: make sure to select the automatically generated class : CmktCapExternalRateService_CmktCapExternalRateInvAction_OUT_2XX
- Click Done to validate the variable creation and done to validate the action creation
Where are we?
At this step, we have been able to configure an action, give it as a parameter the amount of cryptocurrency and the code to get a feedback
What remains to do?
Get the value in the variable and display it in a field on the screen
Display the result in the Salesforce screen flow
I will not detail all the detail of how the rest of the flow is working, since it’s more a matter of how to design flow.
Here is the flow that I get (the complexity is that we get some data in an array, so we have to loop around this array to extract the Data)
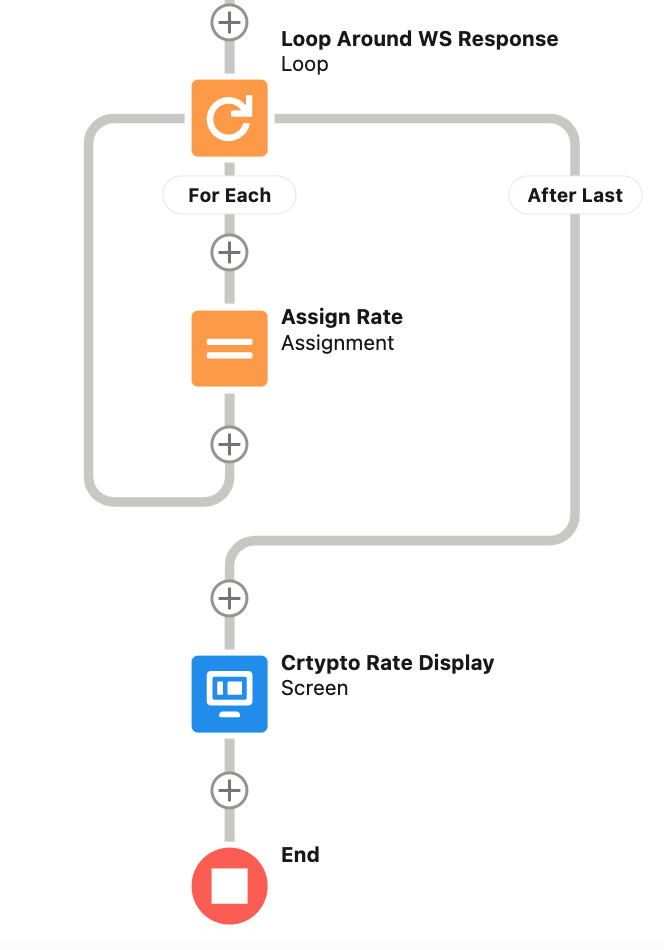
If you need to understand the format of the Data you retrieve from the API, feel free to Open the Apex generated result class and see in which variable is the result you request the API for…
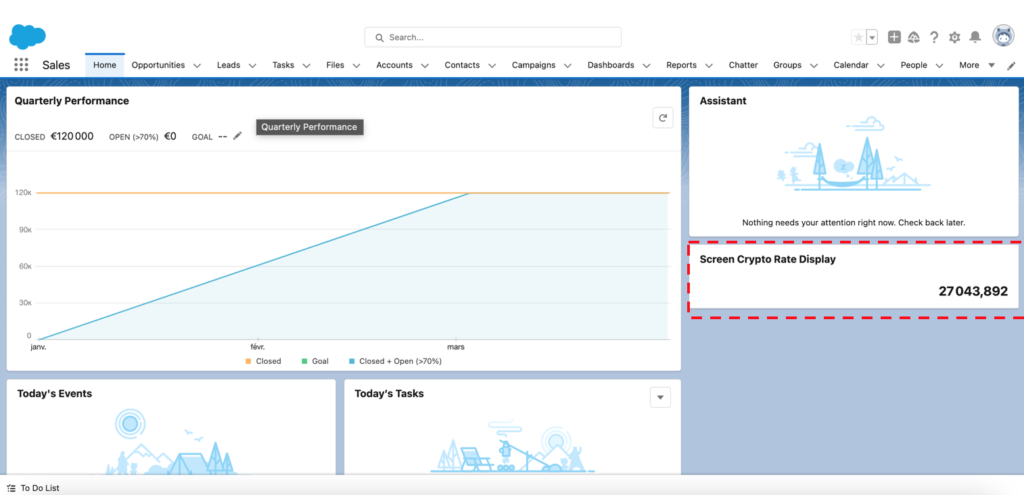
When you have finished the flow, you can add it on a home page for example and see the result!
We can see that while I’m writing this blog post, 1 BTC = 27k $ USD thanks to the HTTP callout that get the value on every refresh.
The errors you may get while designing you flow
When giving a sample response, you may get the error :
“Something’s not right with the value specified for field null. Check it and try again.Review”
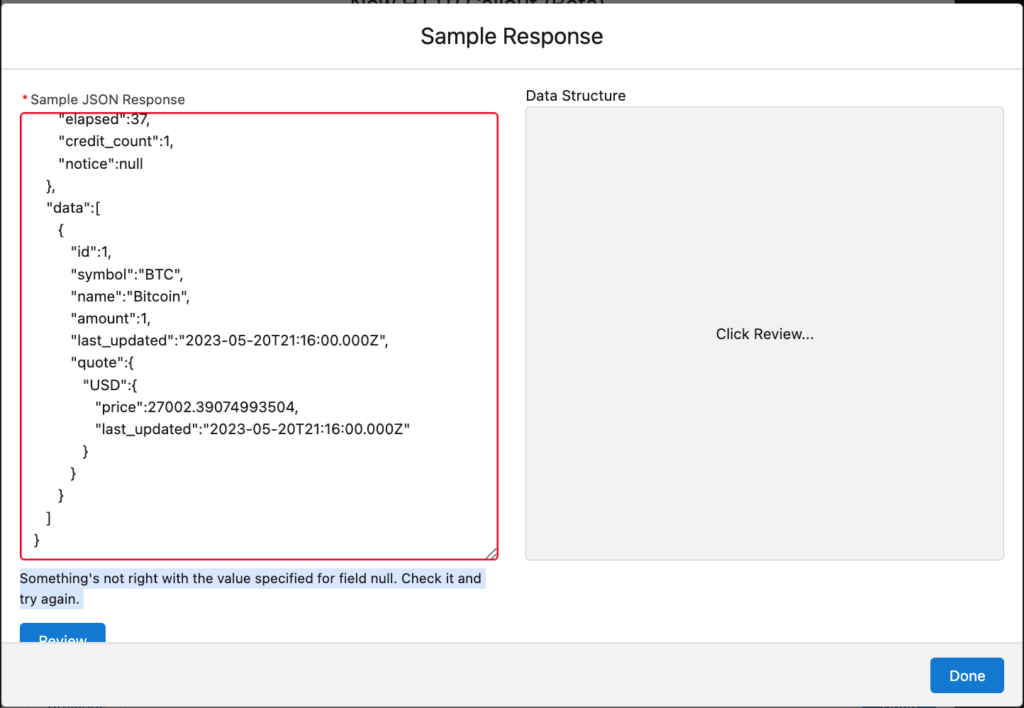
We can see that here, the problem is that in the sample provide, the null value is not surrounded by double quotes.
Pay attention to the types when providing an example !
“Error Occurred: Unable to map response for output parameter 2XX of invocable action”
This is an error you get when the Flow requests the API.
The problem here is that the structure that have been generated doesn’t correspond to the structure of the data the flow gets as a response.
For exemple, a list of data was returned by the API while a single data
How to solve it? Review the Apex class generated (here: CmktCapExternalRateService_CmktCapExternalRateInvAction_OUT_2XX) and compare it to the data you get using a curl. You might understand what’s going on.
We have been able to setup a Salesforce flow http API callout with a screen flow!
Hope that you enjoyed this tutorial, feel free to comment and ask for details!